There’s something so satisfying about shaping kebabs with your own hands, watching them sizzle in butter, and serving them up with hot parathas and green chutney.
Seekh kebabs have always felt like a special-occasion dish for me, but the truth is they’re easy enough for a weekday dinner if you plan ahead a little.
I remember the first time I made these at home—I was so nervous about getting the shape right. But after a couple of tries (and sticky fingers), it became second nature. Now they’re a staple for us on nights when we want something extra flavorful but still simple enough to cook on the stovetop.

If you love the smoky, spicy kebabs you get at roadside stalls or restaurants, you’ll be thrilled at how close you can get at home. Let’s talk about what you need to make them.
Ingredients That Make These Kebabs Shine
Chicken Mince – I usually grind boneless chicken breasts in my food processor. Freshly ground meat gives the best texture, but store-bought ground chicken works too.
Onion – I crush it finely so it practically melts into the meat, keeping the kebabs juicy. If I’m feeling fancy, I’ll grate it instead of chopping.
Green Chili – Optional but recommended. It gives the kebabs a gentle heat. I sometimes remove the seeds if cooking for kids.
Coriander Leaves – Don’t skimp on these. They bring that fresh, herby aroma that makes the kebabs irresistible. I’ve tried adding mint leaves too when I have them on hand, and they work beautifully.
Ginger-Garlic Paste – Nothing beats fresh. I grind up ginger and garlic myself, but store-bought paste is handy on rushed days.
Spice Powders – A little ground chili, cumin, garam masala, cardamom, and black pepper. This mix is what gives the kebabs their signature warmth and depth.
Melted Butter – One of my secret weapons. It keeps the kebabs moist, rich, and absolutely melt-in-your-mouth. I love brushing extra on while cooking.
Breadcrumbs – Essential for binding. If I don’t have any, I just tear up a slice of bread and pulse it with the meat.
Lemon Juice – Adds a bright, tangy finish. I always squeeze a little extra over the kebabs just before serving.
Getting the Mixture Just Right
Over the years, I’ve picked up a few tricks to make sure the kebab mixture is perfect:
- Consistency is key – If it’s too wet, shaping is a nightmare. I add breadcrumbs a little at a time until it holds together.
- Chill Time – I always let the mixture rest in the fridge for at least an hour. It firms up, the flavors meld, and shaping is much easier.
- Butter – I don’t hold back. A generous dose in the mix and a final brushing right before serving make all the difference.
Shaping Your Seekh Kebabs Like a Pro
This part is honestly fun once you get the hang of it.
- Wet your hands lightly so the meat doesn’t stick.
- Take a portion of the mix and roll it into a log shape.
- Press it gently onto a skewer, smoothing it evenly all around.
- If it starts to fall apart, don’t panic—just press it back on or chill the mix a little longer.
When I first tried making these, I was convinced mine would never stay on the skewer. But a bit of practice and the right mix consistency really help.

How I Cook Them at Home
I don’t have a tandoor (sadly), so I usually make mine on the stovetop in a heavy tawa or grill pan. Here’s what I do:
- Heat the pan over medium heat with a bit of ghee or butter.
- Place the skewered kebabs on the pan.
- Rotate them gently so they cook evenly on all sides.
- Brush with more melted butter as they cook for that irresistible glossy finish.
- They take about 6–8 minutes, and the smell is enough to get everyone hovering in the kitchen asking, “Are they done yet?”
If you prefer baking, you can pop them in a hot oven or even grill them on a barbecue for that smoky flavor.
Serving Ideas to Make It a Feast
For me, the best part about making seekh kebabs at home is how versatile they are. Here are some ways we love to eat them:
- Classic Style – Hot off the pan with lemon wedges and sliced onions.
- With Parathas – Roll them in a warm paratha with green chutney and a sprinkle of chaat masala. So good you’ll want seconds.
- As a Kebab Roll – I stuff them in toasted hot dog buns with mint chutney, shredded lettuce, onions, and a drizzle of spiced mayo or ketchup. A perfect fusion “Indian hot dog.”
- Party Platter – Serve them with small bowls of chutneys, pickled onions, and flatbreads so everyone can build their own.
These kebabs are always a hit at gatherings, and they’re easy to make ahead of time if you’re feeding a crowd.
My Tips for the Best Kebabs
- Make sure the mixture isn’t too wet—breadcrumbs are your friend.
- Letting it rest in the fridge really helps with shaping.
- Don’t overcook. Chicken cooks quickly, and overdoing it dries it out.
- Brush with melted butter or ghee while cooking. It keeps them moist and adds shine.
- Sprinkle chaat masala and squeeze fresh lemon juice just before serving for an extra pop of flavor.

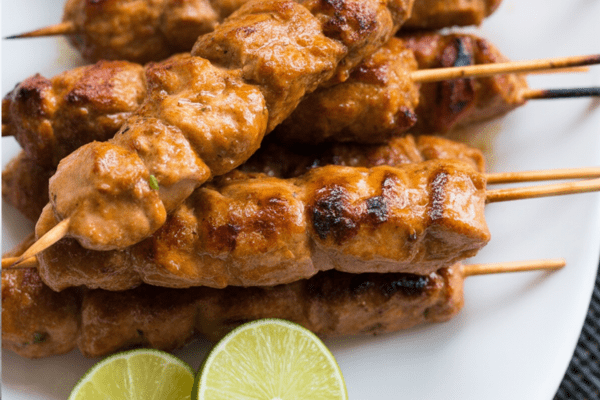
Chicken Seekh Kebab
There’s something truly irresistible about smoky, tender seekh kebabs sizzling on a hot tawa — the aroma of spices, the buttery glaze, the burst of flavor with every bite.
Ingredients
- 250g chicken mince
- 1 medium onion, roughly chopped
- 1 green chili, roughly chopped
- ¼ cup fresh coriander leaves
- 2 tbsp ginger-garlic paste
- 1 tsp red chili powder
- 1 tsp garam masala
- 1 tsp roasted cumin powder
- ½ tsp black pepper
- ½ tsp cardamom powder
- Salt to taste
- 4 tbsp melted butter (plus more for cooking)
- 3 tbsp breadcrumbs
- 2 tsp lemon juice
Instructions
- Blend the Base: Start by blitzing the onions in a blender until you have a coarse paste. Add the green chili, coriander leaves, and ginger-garlic paste. Pulse again until everything is broken down but not overly smooth. Toss in the chicken mince and give it a few more pulses until just combined.
- Spice it Up: Transfer the mixture to a large bowl. Stir in all the spices, breadcrumbs, lemon juice, and melted butter. Mix well to make sure everything is evenly incorporated. Let this mixture rest for about 30 minutes — this helps the flavors meld and makes shaping the kebabs easier.
- Shape the Kebabs: If you’re using long skewers, break them in half if needed. Lightly wet your hands (this prevents sticking), then take a small portion of the chicken mix and form it into a log. Press it around a skewer, smoothing it out so it’s evenly shaped all around.
- Cook to Perfection: Heat a little butter in your tawa. Gently place the skewered kebabs onto the pan and cook over medium heat, turning them occasionally until golden brown and cooked through. Brush with extra butter as they cook for that signature sheen and richness.
- Serve It Right: Plate them up with lemon wedges and sliced onions — simple, fresh accompaniments that enhance the kebabs beautifully.
Notes
- You can shape these kebabs in advance and keep them in the fridge (covered) for up to two days. For longer storage, freeze them on a parchment-lined tray until solid, then transfer to freezer bags. When you're ready to enjoy, cook them straight from frozen — no thawing needed!
Nutrition Information:
Yield: 8 Serving Size: 1Amount Per Serving: Calories: 147Total Fat: 11gSaturated Fat: 5gTrans Fat: 0gUnsaturated Fat: 5gCholesterol: 49mgSodium: 236mgCarbohydrates: 5gFiber: 1gSugar: 1gProtein: 8g
Chickenrecipes.blog, occasionally offers nutritional information for recipes contained on this site. This information is provided as a courtesy and is an estimate only. This information comes from online calculators. Although allchickenrecipes.com attempts to provide accurate nutritional information, these figures are only estimates.
Storing and Freezing for Later
These kebabs are great for meal prep.
- In the Fridge – Shape them and keep them covered for up to 2 days before cooking.
- In the Freezer – Lay shaped kebabs on a lined tray and freeze until solid. Then transfer to a freezer-safe container or bag. Cook straight from frozen on the pan or grill when needed.
It’s so handy to have these ready to go for busy nights or unexpected guests.
I hope you’ll give these homemade chicken seekh kebabs a try. They’re full of flavor, fun to shape, and such a rewarding meal to share with family and friends. Trust me—once you try them, you’ll be hooked.
Try other recipes: