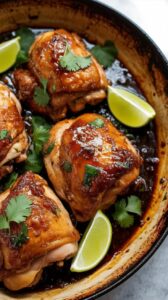
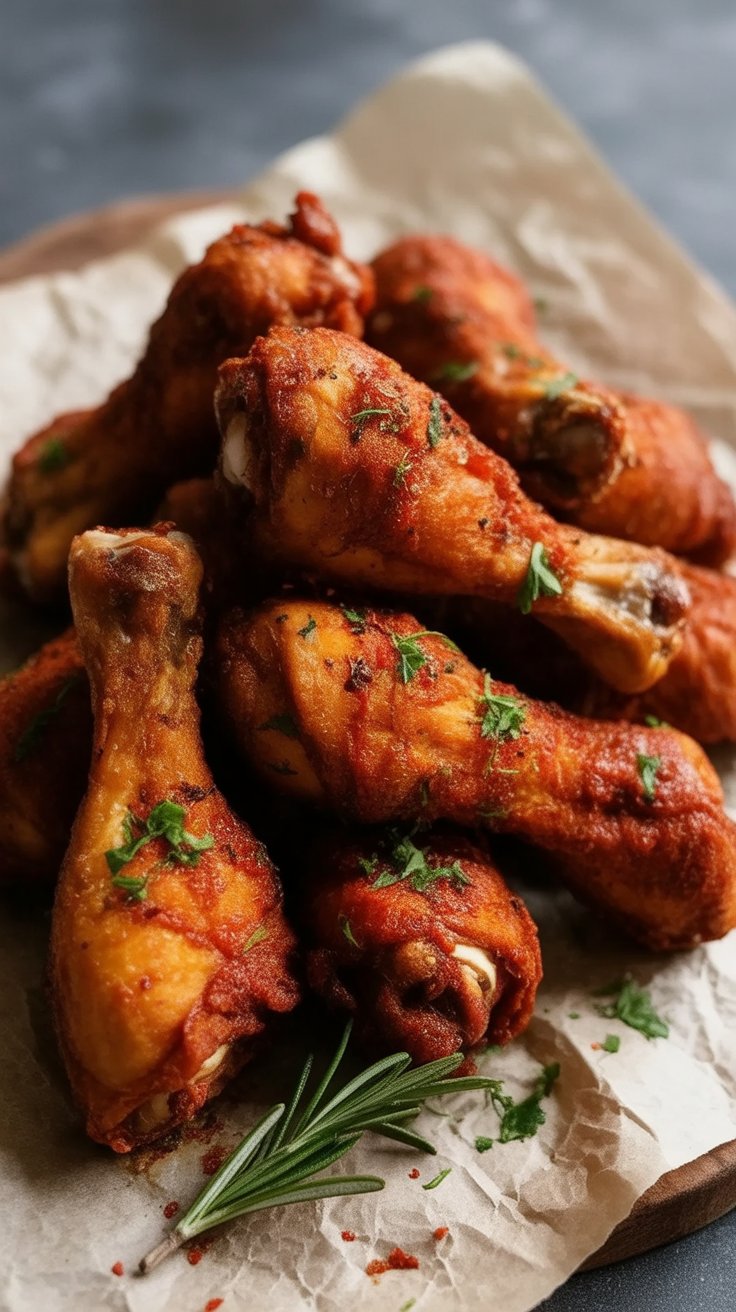
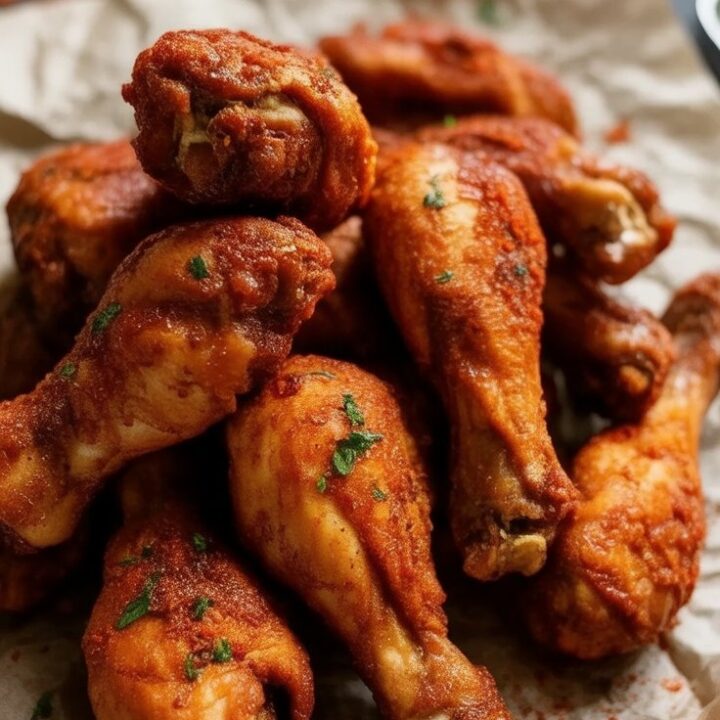
Sometimes, the best recipes are the simplest ones—like these crispy baked chicken drumsticks. I make them when I need something fuss-free but still crave-worthy. The seasoning is made from pantry basics, and the trick to that golden, crunchy skin? Baking powder. Sounds odd, but trust me, it works.
 We make this all the time in my kitchen, especially on weeknights when everyone’s hungry and I don’t want to spend hours cooking. Plus, nothing beats grabbing a drumstick right off the tray and eating it with your hands. No plates required.
Why I Keep Coming Back to This Recipe
Look, I love a fancy chicken dish now and then, but there’s something unbeatable about the comfort of baked drumsticks. They’re juicy, flavorful, and let’s be honest—way more fun to eat than dry chicken breasts.
What I really love is how versatile this recipe is. I’ve served these drumsticks with everything from fried rice to cold pasta salad, and they always hit the spot. My trick? Always make a few extra—leftovers are gold for quick wraps or next-day lunchboxes.
 What You’ll Need for These Drumsticks
Here’s a quick peek at what goes into the seasoning mix. You probably already have everything on hand.
-
Chicken drumsticks – I use skin-on for maximum crispiness. If I have bone-in thighs or wings, they work too.
-
Baking powder – This is the secret. It helps draw out moisture from the skin so it crisps up in the oven. Just double-check you’re not using baking soda—they’re not the same.
-
Paprika, garlic powder, onion powder – The trio that makes this taste like a BBQ rub. I’ve tried it with smoked and sweet paprika, and both are great.
-
Flour – Helps the seasoning stick and gives a nice even coat all over.
I sometimes swap in chili powder or cayenne for a little heat, especially if we’re in the mood for something spicier.

 My Step-by-Step Method
Here’s how I make sure every drumstick comes out crispy and flavorful:
1. Mix the Seasoning
I mix everything in a wide bowl so it’s easy to roll the drumsticks around. I’ve found this is the best way to make sure they get evenly coated.
2. Oil the Chicken
A little oil goes a long way. It helps the seasoning stick and gives the skin that nice browned look. I usually rub it in with my hands—messy but effective.
3. Stretch the Skin
This might sound odd, but it works. I gently tug the skin to cover as much of the meat as possible because bare meat doesn’t crisp. It makes a noticeable difference.
4. Coat in Seasoning
I press each drumstick into the seasoning, turning it so the whole surface gets covered. Then I shake off the excess to avoid a cakey layer.
5. Rack on a Tray
I always bake these on a rack over a foil-lined tray—less mess, and the hot air can circulate under the drumsticks. No rack? Line the tray with parchment and flip them halfway through.
6. Spray Generously with Oil
This is what helps mimic the texture of shallow frying. Be generous here—it’s what gets that skin golden and crispy.
7. Bake
Start at 200°C (390°F) for about 30 minutes. Then crank up the heat to 220°C (430°F) for another 15 minutes or so. Keep an eye toward the end—you might need a few more minutes depending on your oven.
How to Serve These
These drumsticks are so versatile. Here’s how I usually serve them at home:
-
Weeknight dinner: I throw them on a plate with leftover fried rice or warm some up quickly in a pan.
-
BBQ-style: Paired with macaroni salad or potato salad, and eaten cold or hot—your call.
-
Lighter meal: Served with a big chopped veggie salad or my favorite kale quinoa salad, which keeps well in the fridge.
They also make a great party snack. Just pile them on a big platter with napkins nearby—trust me, they’ll disappear fast.
Can I Make These Ahead?
Yes, absolutely. You can coat the chicken in seasoning and keep it in the fridge for a few hours before baking. Just take them out 10–15 minutes before they go into the oven so they don’t go in fridge-cold. The seasoning holds up fine, and it even gives the flavors more time to soak in.
If you’re making them fresh, though, try not to let them sit too long once baked. That crispy skin softens if they cool completely.
Storing and Reheating Tips
If you have leftovers (we rarely do), store them in an airtight container in the fridge for up to 3 days.
To reheat:
-
Oven: 180°C (350°F) for about 10–12 minutes.
-
Air fryer: 180°C (350°F) for 5–6 minutes.
Microwaving works in a pinch, but the skin will lose its crispness.
Oven Baked Chicken Drumsticks
These crispy baked chicken drumsticks are my go-to when I need something simple, satisfying, and loved by everyone at the table.
Ingredients
- 12 chicken drumsticks
- 2 tablespoons olive oil
- Oil spray, for baking
- 4½ tablespoons all-purpose flour
- 3 teaspoons baking powder (not baking soda)
- 5 teaspoons smoked paprika
- 3 teaspoons garlic powder
- 3 teaspoons onion powder
- 2 teaspoons ground black pepper
- 1½ teaspoons kosher or cooking salt
Instructions
- Preheat and prep the tray : Set your oven to 200°C (390°F) or 180°C fan. Line a baking tray with foil for easy cleanup and place a wire rack on top. This helps air circulate and crisps the underside of the chicken. No rack? You can bake directly on foil—just flip halfway through and extend the bake time a bit.
- Make the seasoning mix : In a shallow dish, combine flour, baking powder, paprika, garlic powder, onion powder, black pepper, and salt. Give it a good stir until evenly mixed.
- Prep the drumsticks : Pat the chicken dry if needed, then drizzle olive oil over the drumsticks and rub it in well. Stretch the skin to cover as much meat as you can—this helps with even browning.
- Coat the chicken : Dredge each drumstick in the seasoning blend, pressing lightly to coat. Shake off any excess and place it on the prepared rack. Repeat with all the drumsticks.
- Spray and bake : Spritz the tops of the drumsticks with oil spray to help the crust crisp up in the oven. Bake for 30 minutes, turning the tray around halfway for even cooking.
- Crank up the heat : After 30 minutes, increase the oven temperature to 220°C (430°F) or 200°C fan. Bake another 15 minutes until the skin is golden and crispy.
- Serve hot and enjoy : Let the chicken rest for a few minutes out of the oven, then dig in while the skin is still crackly. These are amazing with mashed potatoes, coleslaw, or even tucked into a sandwich roll with a slather of barbecue sauce.
Notes
- No wire rack? Bake directly on the foil and flip the drumsticks halfway through. You might need an extra 5–10 minutes to get that crispy top.
- Want to switch it up? You can use bone-in, skin-on chicken thighs—just adjust the bake time (35 minutes at 200°C, then 15 minutes at 220°C).
- Baking powder tip: This isn’t for rising—it’s the secret to getting that skin crisp in the oven. Just make sure you're using baking powder, not baking soda.
Nutrition Information:
Yield: 6 Serving Size: 1Amount Per Serving: Calories: 434Total Fat: 24gSaturated Fat: 5gTrans Fat: 0gUnsaturated Fat: 16gCholesterol: 231mgSodium: 778mgCarbohydrates: 9gFiber: 1gSugar: 0gProtein: 45g
Chickenrecipes.blog, occasionally offers nutritional information for recipes contained on this site. This information is provided as a courtesy and is an estimate only. This information comes from online calculators. Although allchickenrecipes.com attempts to provide accurate nutritional information, these figures are only estimates.
Questions I Often Get
Can I use thighs or wings instead?
Absolutely. Just keep an eye on the bake time—wings will cook faster, thighs a bit slower. As long as they’re skin-on and bone-in, you’ll get that same crisp outside.
What if I don’t have baking powder?
You can still make this, but the skin won’t crisp up as much. I’ve tried it both ways—baking powder really does make a difference.
Can I make this gluten-free?
Yes. Use a gluten-free flour blend in place of regular flour. I’ve done it with rice flour and it works just fine.
What kind of paprika is best?
Smoked paprika adds a deeper flavor, but sweet or regular paprika is great too. I often switch depending on what I’ve got in the drawer.
If you love crispy, juicy chicken without deep-frying, this recipe’s for you. I hope it becomes one of your weeknight favorites like it has in my home. Let me know how you serve yours—I’m always up for new side dish ideas.
Try other Chicken recipes: