I’ll tell you right now: once you start baking quesadillas in the oven, you may never go back to the pan. This method is my favorite for busy weeknights when the last thing I want is to stand over the stove flipping each one while the kids are asking about homework and the dog is eyeing the dinner table.

These shredded chicken quesadillas turn out beautifully crisp on the outside, perfectly melty inside, and the best part? You can make a big batch all at once—so everyone eats hot at the same time.
Ingredients You’ll Need
Here’s what I typically pull out for these, with a few thoughts from my own kitchen:
- Shredded Chicken: I usually poach a couple of chicken breasts in advance, but rotisserie works great too. I always try to pick a plain, lightly seasoned one so it soaks up the salsa flavors.
- Salsa: I like a smoky, fire-roasted salsa for depth. Sometimes I’ll use a fresh pico de gallo if I want it brighter. The chunkier the salsa, the more texture you’ll get.
- Green Onions: These add a fresh bite. I trim them and slice them thin so they disappear nicely into the filling.
- Cilantro: I know some folks skip it, but I love its freshness. I just give it a rough chop so you get little green pops throughout.
- Diced Green Chiles: I keep a few cans in the pantry for things like this. They’re mild but add that unmistakable flavor that makes you think of classic Tex-Mex.
- Monterey Jack Cheese: I always buy it in a block and shred it myself. It melts better and tastes creamier.
- Flour Tortillas: I prefer the medium-sized ones so they’re easy to fold and bake evenly. I warm them a few seconds in the microwave if they’re stiff so they don’t crack.
- Vegetable Oil: I usually use avocado oil for its neutral taste and high heat tolerance.
Why These Quesadillas Are a Weeknight Hero
Honestly, these save my sanity on busy evenings. Once the filling is mixed, I just assemble them all at once and pop them in the oven. No babysitting, no turning them one by one in a pan while smoke fills the kitchen.
We’ve served these for family movie nights, casual get-togethers with friends, and even for dinner when we’re too tired to do much else. Everyone can help themselves, and you can focus on relaxing with a cold drink instead of hovering over the stove.
They’re kid-approved too. My little one isn’t a big fan of spicy food, so I keep the heat mild. For us adults, I’ll leave out a bottle of hot sauce on the table.
Tips I’ve Learned Making These Over and Over
- Heat That Oven Well: Don’t rush preheating. A properly heated oven is what gives you those crispy edges without drying out the filling.
- Spread That Filling Evenly: Don’t just dump it in the center. Spread it all the way to the edges (leave a small border) so every bite is packed with flavor.
- Generous Cheese is Your Friend: Don’t be stingy. Cheese is the glue that holds everything together. A good melting cheese ensures those satisfying strings when you pull them apart.
- Line That Tray: I always line my baking sheet with parchment or foil. Clean-up is so much easier. Trust me—you’ll thank yourself later.
- Watch Them at the End: Every oven is a little different. Start checking a few minutes before the recipe says to. You want golden, not burnt.
Ways to Change It Up
I rarely make these exactly the same way twice. Some of my favorite variations:
- Different Cheeses: Try sharp cheddar, mozzarella, or Pepper Jack if you like it spicy. I’ve even done a blend of cheeses if that’s what I have on hand.
- Play with Salsa Types: A green tomatillo salsa gives a tangy brightness. Chipotle salsa adds a smoky, deep heat.
- Sneak in Extra Veggies: I sometimes add a handful of baby spinach, diced bell peppers, or zucchini. Just keep it balanced so it doesn’t get soggy.
- Turn Up the Heat: Add sliced jalapeños or a pinch of cayenne if your crowd likes it spicy.

Storing and Reheating Like a Pro
If you’re lucky enough to have leftovers, here’s what I do:
- Fridge: Wrap them or put them in an airtight container. They’ll keep for about 3 days.
- Reheat: I prefer the oven at 350°F for about 8 to 10 minutes to get them crispy again. In a pinch, I’ll warm them in a skillet for a couple of minutes on each side.
- Freezer: These freeze beautifully. I wrap them individually in plastic wrap or foil, then pop them in a big freezer bag. They’ll last up to 2 months. To reheat, I bake them straight from frozen. No thawing needed.
What I Like to Serve on the Side
I keep things simple and fresh. Here are some of my favorite pairings:
- Guacamole: Nothing beats that creamy, rich contrast.
- Salsa: I’ll put out bowls of different types so everyone can choose their favorite.
- Pico de Gallo: Fresh, bright, and adds a little crunch.
- Mexican Chopped Salad: When I want to make it feel more like a full meal, a crisp salad with lime dressing is perfect.
How I Make Them Step by Step
Here’s the basic approach I follow every time:
- In a big bowl, I toss shredded chicken with salsa.
- Then I add the green onions, cilantro, green chiles, and loads of shredded cheese.
- On the counter, I lay out the tortillas and spoon the filling onto one half, leaving a small border.
- I fold them over and press lightly to seal.
- I brush both sides with oil and arrange them on a parchment-lined baking sheet with the folded sides facing inward so they nestle in nicely.
- Bake them until they’re golden and crispy on the outside and gooey inside.
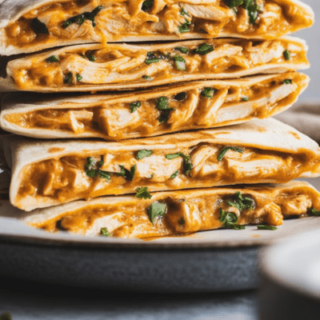
Shredded Chicken Quesadillas
Golden, crisp tortillas packed with juicy, salsa-kissed chicken, melted cheese, and the bold flavors of green chiles and fresh herbs — these quesadillas are a weeknight dream or an easy crowd-pleaser.
Ingredients
- 4 flour tortillas (8-inch)
- 8 oz Monterey Jack cheese, shredded
- 12 oz cooked, shredded chicken (rotisserie chicken works great)
- ½ cup of your favorite salsa (add more if you like it saucy)
- 2 green onions, very thinly sliced
- ¼ cup fresh cilantro, finely chopped
- 4 oz canned roasted green chiles, drained
- 2 tbsp vegetable oil (avocado or any neutral high-heat oil)
Instructions
- Get the oven going – Preheat to 425°F (218°C) and line a baking sheet with foil.
- Mix up the filling – In a large bowl, toss the shredded chicken with salsa until coated. Stir in the green onions, cilantro, green chiles, and shredded cheese. Don’t overmix — just enough so everything’s nicely combined.
- Assemble the quesadillas – Lay the tortillas out flat. Spoon about a quarter of the chicken mixture onto one half of each tortilla, keeping a small border around the edge. Fold the other half over and press gently to flatten.
- Brush and bake – Lightly brush the top side of each folded tortilla with half the oil. Place them oiled side down on the prepared baking sheet, spacing evenly. Brush the top sides with the remaining oil.
- Crisp it up – Bake for about 10 minutes until the bottoms start to turn golden. Flip carefully using a spatula, press down slightly, and bake another 5 minutes or until perfectly crisp and browned.
- Slice and serve – Let them rest for 5 minutes before slicing into wedges with a sharp knife or pizza cutter. Serve hot, with salsa, sour cream, or guacamole if you like.
Notes
- Feel like making it from scratch? Roast your own green chiles for an extra smoky flavor boost.
- Want it spicier? Toss in some chopped jalapeños or a pinch of chili flakes.
Nutrition Information:
Yield: 4 Serving Size: 1Amount Per Serving: Calories: 599Total Fat: 33gSaturated Fat: 14gTrans Fat: 0gUnsaturated Fat: 17gCholesterol: 114mgSodium: 1102mgCarbohydrates: 34gFiber: 3gSugar: 4gProtein: 41g
Chickenrecipes.blog, occasionally offers nutritional information for recipes contained on this site. This information is provided as a courtesy and is an estimate only. This information comes from online calculators. Although allchickenrecipes.com attempts to provide accurate nutritional information, these figures are only estimates.
These oven-baked quesadillas are a lifesaver on those nights when I want dinner to be delicious but low-effort. I hope you try them out and make them your own with your favorite twists.
Try other Shredded Chicken recipes: